To use NeXafe a person must be have a User profile in the platform. You can also add employees as a source of internal reference (e.g. in a form to identify a person) even if they don’t need to access the platform. Users can be created individually, by batch, or by Microsoft SSO connection (Single Sign On).
To create multiple Users using a SSO connection
Left menu: Users ⇒ Top sub-menu: Microsoft SSO
- Click the blue Connect SSO button.
To create an individual User
Left menu: Users ⇒ Top sub-menu: Users
- Click the +User blue button
- Enter mandatory Information:
- First Name
- Last Name
- Email.
- Add optional information if wanted (they can be added later)..
- Click the Save blue button.
To create multiple Users by batch upload
You can batch import user information to create new User profiles, with an Excel CSV file format. NeXafe provides a Template file that should use to upload your information.
Left menu: Users ⇒ Top sub-menu: Users
- Click the Import blue button to open the Import management window.
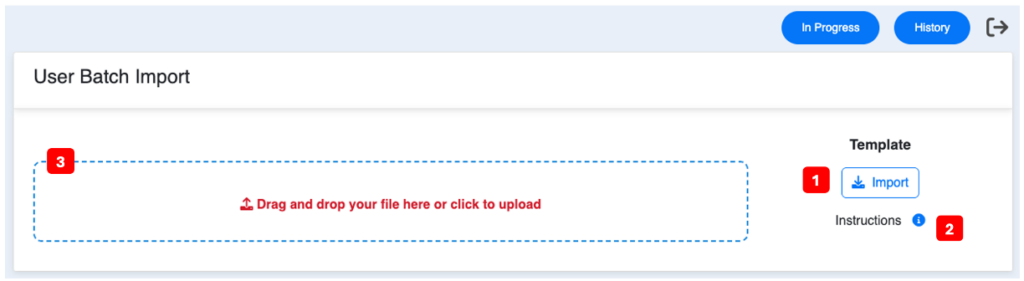
- Click the Import button 1️⃣ to download NeXafe’s Template file.
- The file is downloaded in your default download folder.
- You can click at anytime the blue Information icon 2️⃣ to see the list of mandatoy fields to complete.
- Open the Excel Template in edition mode (procedures might varies based on your setting and if you are using Windows or Apple).
- Fill all information (mandatory remains first name, last name, email, an language) for all new Users.
- Language: en for English / fr for French.
- Save your file to CVS format (procedures might varies if you are using Windows or Apple).
- Drag and drop your updated CVS file on the Import zone 3️⃣ or click the zone to select your file.
- Your list of Users to import will be displayed in the Import zone.
- Scroll down the list and click the Submit blue button to import the user list.
- You will automatically be transferred to the In Progress window.
- Creation might take a few minutes depending on the volume of Users and information imported.
- Go back to Users to see your new additions.
💡 Good to know
- You can filter your User table on the creation date to easily see your latest imports by using the Created from filter.
- If you don’t see you creation date column, click on the Cogwheel icon at the end of the table header to select the option.
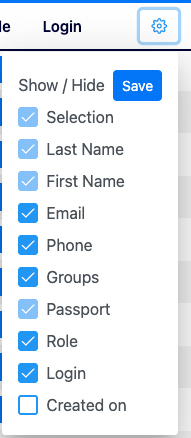
- You can modify the position of a column in your table by clicking and holding the column name then moving it to the desire position and releasing your click to fix it in its new place.